Professional Online Portfolio
443-852-4675


Pine Wood Derby
Applying the principles of physics, my design team and I designed the ideal pinewood derby car. The car assembly and parts are displayed below.

Parts


Wind Turbine Blade
My design team researched, constructed, and tested a small scale wind turbine propeller to generate the most amount of electricity. I researched the airfoil shape, pitch angle, length, and taper along the root to tip of the blade. The design was prototyped via CAD modeling and 3D printed. Each model was constrained to a 4 inch diameter. Testing took place in a wind tunnel ranging from various wind speeds. My team won first place in the competition.
The three prototypes with varying number of blades are shown below.
One Blade Concept

Two Blade Concept

Three Blade Concept

Airfoils
Compiling my research, I drafted three airfoil shapes offset from each other. When lofted together, the airfoil's pitch angle gradually increases while the height and length decrease from root to tip. This allows the blade to curve and taper for maximum aerodynamic performance, thus generating the most amount of electricity.

Coastal Environment Simulator
During my undergraduate research, I engineered a system of water tanks, heaters, lights, and water pumps to accurately simulate underwater conditions in the Virginia Coastal Reserve. I modeled the assembly of all the components in the environmental chamber in the video below.

Chess Piece
I created a chess piece by utilizing more advanced techniques such as chamfering, filleting, radial arrays, and parametrizing. Final product was dimensioned in an orthographic.


Parametrics
This is the parametric spreadsheet which ensures all parts are proportional to each other. If one part size changes, the rest of the part adjusts to stay in proportion.
Orthographic
The chess piece is fully dimensioned in this orthographic.

Hole Callout
I completed this activity in high school which shows the different types of holes that can be created for a variety of screws.
Orthographics
The pitcture on the left labels the type of hole and the picture on the right shows the dimensions/specifications of each hole in the table.
 |  |
|---|
Toy Train
I created a toy train by modeling several parts and assembling them together on a train track. Then I made an animation to show the train moving on the track. All parts move as they would in real life.
Toy Train Animation
Click the play button to view the toy train animation. I used driving constraints to turn the wheels by setting the degrees of rotation. Geometric constraints were also used to make sure the wheels turn at the same time.
Tolerance
In this high school activity, I dimensioned a part and added a tolerance, the acceptable amount of variation in a part. Limit dimensions, bilateral and unilateral tolerances were used.

Puzzle Cube
In this project I recreated an exact replica of my pen by measuring each piece individually and drawing them in Autodesk Inventor before finally assembling them.
Orthographics
Here is a sample of some of the pieces that were dimensioned in this orthographic.
 |  |
|---|

Assembly Drawing
This is the assembly drawing of all the puzzle cube pieces locating where each part goes.
Puzzle Cube Assembly
Click the play button to view the puzzle cube assembly
Pilot G-2 Gel Pen
In this project I recreated an exact replica of my pen by measuring each piece individually and drawing them in Autodesk Inventor before finally assembling them.
Orthographics
Here is a sample of some of the pieces that were dimensioned in this orthographic.
 |  |
|---|
Pen Assembly
The final product all assembled.

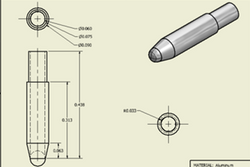
Magnifier Attachment
In this project I created a magnifying glass that can slip onto a screwdriver to help those who are farsighted see the screw they want to screw in.
Orthographic
This design is simple and effective for the user to use.

Assembly

Assembly Video
Video of the design concept. The user simply slips the magnifier attachment onto the shank of the screwdriver to use, then slips the magnifier off when done using.